Our Legislative Committee offers help sessions on Sunday afternoons at the Cornish Pasty. Learn to use the Arizona Request to Speak system to lobby our legislature!
(Contact Marie Sansone at (928) 380-7105, if you have any questions re these tips, or find any errors).
RTS = Request to Speak
BSI = Bill Status Inquiry
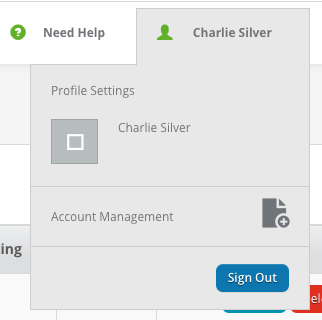
For added emphasis when weighing in on bills in the Request to Speak system, it’s important to identify yourself as a registered voter. Here are instructions:
- Log in to RTS
- Choose Account Management
- Update your Personal Information so you are identified as a voter
- Update personal information
- You’re done!

TO FIND A COMPLETE LIST OF ALL SENATE AND HOUSE BILLS:
1. Go to http://www.azleg.gov
2. Click on Bills
3. Click on Bill Info
4. You will see a complete listing of all bills, as well as memorials and resolutions
5. If you click on a bill, memorial, or resolution number, the website will take you directly to its BSI page.
6. To get to the RTS application from the BSI page, click on the “Applications” button, the four green square dots, at the top right hand corner of your screen, and sign on.
To keep both the RTS and BSI Applications open at the same time so that you can toggle back and forth, hold down the control key or the command key while clicking on RTS.
TO ORGANIZE YOUR BILLS AND TRACK THEIR STATUS:
1. Sign onto RTS/BSI at https://apps.azleg.gov
2. To keep both the RTS and BSI Applications open at the same time so that you can toggle back and forth between them, click on “Applications” and then control-click or command-click on whichever application is not open. You should see two tabs on your screen.
3. Click on the Bill Status Inquiry tab.
4. On the side menu, click on “Personal Progress.” This will take you to a page for “My Bill Lists” and “My Alerts”
5. Figure out how you want to organize the bills; for example, by list names such as Health, Education, Voting Rights, Native Americans, High Priority, Personal Interest, etc. You should also create a list for Miscellaneous or Other.
6. Type the name of each list one by one into the box and click “Add List” after each entry.
7. You can rearrange your lists alphabetically, by order of importance, or however you would like by clicking on a list name and then using your computer mouse to move it up and down into place.
You will see some colored buttons next to each list name.
The blue button with the exclamation ! symbol is the default setting to receive bill alerts. Leave this button “on” to enable alerts.
If you click on the turquoise A|B button, you will be able to change the name of your list. Remember to click “Save” after you type in the new name.
8. Now you are ready to import bills into your bill lists. [This is really cool!]
METHOD NO. 1
9. Click on the appropriate list. This will open a box on the right hand side of the screen where you can type in the bill number or a phrase from the bill title. It takes a few seconds for the BSI system to format the bill number and retrieve the short title. The system will enter the bill onto your list automatically.
10. Click on the “Comments” button if you want to make a few notes about the bill as reminders for yourself. These notes are NOT the same as the RTS comments that you would send to the legislative committees. Click “Save” when you are done.
METHOD NO. 2: (For when you want to import the same bill into more than one list, for example, if you wanted to track environmental education legislation bill in both your “Environment” and “Education” lists).
9. Click on “Bills” in the side menu.
10. Enter the Bill Number into the search box and click “Search.”
11. The BSI page for the bill will come up. If you want to make some notes about the bill as reminders for yourself, you can type them into the pop-up box called “Personal Bill Comments” at the upper right-hand corner of the page. Click on “Update Comments” to save them. These notes will show up on your Personal Progress page, in your bill lists. They are NOT the same as the RTS comments that you would send to the legislative committees.
12. Now, go down to the bottom of the page and click on “Select a List.” From this page, you can select more than one list. Then click “Send to List(s).” When you are done, go back to the Personal Progress page.
Now you are ready to track your bills. The “My Alerts” tab will do this for you!
13. Look at the top right-hand corner of the screen. If you see an orange dot next to “Alerts,” that means you have a bill alert on the “My Alerts” page.
14. Click on the “My Alerts” tab. You can view your alerts all at one time, or view them according to your Bill List topics.
15. The Alert will show you where the bill is in the legislative process.
16. Click on the bill. This will take you to the BSI page for that bill. From here, you can decide whether you want to take a position on the bill (thumbs up / down / neutral) and if the bill is in committee, make RTS comments on the bill or take other action, such as telephoning or emailing the appropriate legislators, etc. Jot down the bill number on a piece of scrap paper so that you will have it handy.
17. To record your bill position and/or RTS comments, you will have to go to the RTS application. If you still have it open, click on the RTS tab. If not, go to the top right hand corner of the webpage and click on “Applications” and control-click or command-click on RTS.
18. On the side menu, click on “My Bill Positions” and enter the bill number (the one you jotted down on the scrap paper) to record your bill position. Your bill position will be visible to the legislators, their staff, and the public, and remains in place for the life of the bill. If you wish to change your position; for example, if the bill is amended, then you will need to Update or Delete your bill position. You can do this from the “My Bill Positions” List, accessed by clicking on either the “My Bill Positions” or the “Home” buttons.
19. If the bill is in committee and “active” for purposes of making a Request to Speak, click on the “New Request” button and enter your bill position (if you haven’t done so already), indicate whether or not you wish to appear and speak at the hearing, and make any comments that you wish the committee to consider.
Requests to Speak comments are viewable by all users performing searches on the bill using the side menu buttons, “Agenda Search” and “Upcoming Agendas.”
If you attempt to make a New Request for a bill that is not in committee and receive a message on your screen that there are “no active agendas” for the bill or that it is “closed” for requests to speak, you can still record a bill position from the “My Bill Positions” page.
20. The RTS application will sort and keep track of your bill positions and requests to speak. Click on the “Home” button, and you will find two complete, numerically sorted lists of your requests and your bill positions.
21. The system will move your Requests to Speak off the “My Requests” list once the bill has moved out of the committee in which you made your request; however, your bill positions will still show up on the “My Bill Positions” list. At that point, if applicable, you would have to make a new Request to Speak in the next committee in which it is scheduled.
If you want to view your prior requests, check the box marked “Include Requests for Past Agendas.” You will not be able to update your comments, but if it has changed, you can update or delete your thumbs up / down / neutral bill position.